google analytics

amazon

11/12/14

German Spaetzle Dumplings Recipe

#DressUpYourNuggets 

  I have been lucky to have been chosen this year to be part of the Chik fil A mom club on Facebook where us moms get together and get to share our input about the beloved food chain and occasionally get yummy treats. Recently they gave us a fun challenge to prepare a semi homemade meal using Chick fil A chicken nuggets and by golly I do love me a challenge. So here is how I dressed up my nuggets.
🐄
Here's what you need to make super easy German Spaetzle dumplings.  
🐄
▫️Chick fil A grilled or crispy chicken nuggets {optional}
▫️3 cups flour
▫️1/4 teaspoon white pepper
▫️1/2 teaspoon nutmeg
▫️1/2 teaspoon onion powder 
▫️dash of salt 
▫️4 eggs beaten
▫️1 cup milk
▫️2 T butter 
▫️bread crumbs 


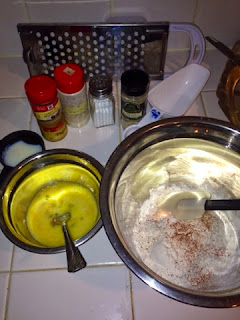
Mix your dry ingredients together in a bowl then alternate mixing in the eggs and milk. Use a strainer or Spaetzle maker to drop the dumplings into a large boiling pot of water cook for a few minutes then drain. Now just saute in a pan with the butter and sprinkle with about 1/4 cup bread crumbs and serve topped with Chick fil A nuggets already cooked to perfection. I also really love this recipe with sausage links.

  Also it helps to have a Spaetzle maker. I finally found one on Amazon here . Don't fear if you don't have one though, you can use a metal strainer with larger holes and push the dumpling mixture through with a spoon it just takes more effort. 

#amazonaffiliate

10/28/14

Grapensteins!

I made these for my daughters Halloween birthday snack to bring to her kindergarten class since they will also be having cupcakes. It was simple and fun for the kids to help make. We have a Cash & Carry store nearby and that's where I got my supples from but you could also get them at Sam's club or Costco.
All you need is 
▪️a pack of clear 10 oz. cups
▪️corresponding lids for the cups 
▪️marshmallows
▪️black sharpies to draw on the cups
▪️green grapes, I bought two packs which equaled 6 lbs. (much cheaper at the bulk stores this time of year) 
made 22 cups

10/8/14

DIY Halloween Gravestones

   Halloween is kinda a big deal at my house plus it is my youngest's birthday which brings it to a whole new level because with costume parties, cake, and loads of candy in one day you can't really go wrong.  ;)
   My husband goes out of his way to pretend to be boring and not care about the holiday but I know better. He told me he was talking to his sister and she brought up DIY gravestones and he suggested getting foam boards to make them and I was like yeah maybe plywood instead. I had always wanted to but sorta forgot and never got around to it. That night I looked up some videos on YouTube and the next morning we went to Home Depot where I headed straight to the foam insulation without verbally admitting he was right. 
  Here's the awesome part.... It's cheap and easy.
  All you need is 
☑️ 1 or 2 thick foam insulation boards I got the 2' by 4' boards which makes  3 gravestones each. Cost under $7 each
☑️ 1 thin insulation board for embellishments. Cost under $3

☑️ 1 can of cheap flat black paint. Cost .99
☑️1 hot glue gun
☑️ thinish metal stakes or cut wire hangers 
☑️ 1 box cutter exacto utility knife. Cost $7

The foam insulation has plastic on both sides usually one white side and one foil side.
I used the white side to draw on because it's ok to make mistakes on the plastic. Then cut my final design, when finished cutting and filling in the letters with black marker to be more visible remove the white plastic but leave the backside on because it helps keep it together. When carving the letters on the grave insert the blade at an angle toward each other on both sides of the letter then remove the carved letter with your finger. This can get a little messy with the foam.
At this point you can go ahead and carefully insert the metal stakes or wait til after painting. Spray painting is super easy just use short spuratic bursts to make it look like stone. You don't want to fully cover with the black paint. You want it to look more grey.
We have made 3 so far and have 3 more to make. These are cheaper than the store ones and I think will last longer and the best part is that I can personalize them. 

9/24/14

Upgrade tacky counters for under $10

   I've been working on a bunh of DIY projects at home these last couple of days to spruce up and refinish some of my furniture and stuff to motivate me to get (and hopefully stay) better organized. Now, I don't know if other people do this or if it's just me but I have to reposition my couches and other furniture every couple of months or it feels boring to keep clean. Maybe that's weird but it keeps me motivated. We are currently renting and have been in this house for several years and there are somethings that I know I can't change that just irritate me so much. If I owned the home I would pull the carpet if at the very least out of the bathroom of all places and replace the counters in the kitchen and bathrooms. There's not much I can do about the kitchen but clean it way more often than I wish to because it is those tiny tiles with grout lines EVERYWHERE uhg. But after three years of trying to make the bathrooms look a little nicer with no success with the pinkish counter tops I finally thought why not resurface it with contact paper?! It's cheap I think I paid 7 or 8 bucks for a roll that did two bathrooms, it was easy to do by myself, and it is not permanent.


8/24/14

Loving the PlanetBox Lunch box

   We survived the first week of school! My baby started kindergarten this year which is every other day here (I am not a big fan of the every other day kinder mind you. But that's a whole other subject.) I got the first PlanetBox for my fourth grader because she isn't a big fan of what they serve for lunch most days at school and I want her to not come home hungry and grumpy at the end of the day. I really liked it and planed to get my kindergartener the smaller lunch box option they have, called the PlanetBox Shuttle, which they just posted a coupon code on their facebook page for 15% off the complete set ordered on their website between 8/20 and 9/1/2014. The rover would be great but she really really liked all the different compartments of the Rover that her sister has so we went ahead and ordered that one because I know it will last her for years to come. So now with this being the first year that I am planning on packing lunches more than not I am putting together foods that I can make ahead and freeze then just toss in their boxes and by the time they get to lunch it will be thawed. So far I have homemade burritos, diy uncrustables, and banana muffins. I will be looking out for more recipes so if you have any suggestions please let me know.


8/10/14

Let the kids be kids!

  I despise watching or reading the news because it makes me so sad, especially when it comes to stories about children. All the abductions, abuse and death from both tragic accidents and horrible people out in the world. All the children who don't get to be just children for long enough. It just gets to me sometimes. 
  Sometimes with my own kids I get caught up in the busy days with work and when they have school, keeping the house somewhat clean and then I look at them and think oh my goodness where has the time gone?! They are growing up so fast! I ask myself what childhood memories do I want them to grow up having and to pass on to their own kids one day? Is having a spotless house and being on edge about it really more important than making tiny fairy donuts on the kitchen floor and getting powder sugar everywhere in the process? Or building forts out of the furniture in the living room? Or random dance parties when we should be getting ready for bed? Nope nothing is more important than building their imaginations and making those memories really. 

8/4/14

Chicken Avocado Salad


▫️ 3 or 4 boiled chicken breasts shredded or chopped
▫️ 1 boiled egg chopped
▫️ 1 whole small avocado or 1/2 large
▫️ Optional tablespoon of mayo
▫️ 1/2 tablespoon lime juice
▫️ garlic powder to taste

Mix ingredients together in a medium bowl, chill fro a bit then serve on buttered toast ( we just made our own butter and it was surprisingly easy and I will post directions soon ) 

Garnish with paprika and or cayenne pepper

This recipe was a surprise hit with my kids served cold in their Rover Lunch Box from www.Planetbox.com

7/28/14

Back to school and PlanetBox

Dun dun duuun!
  The back to school countdown has officially begun for our family. I have one headed to the 4th grade and my baby is going to be starting kindergarten.  They really do grow up so fast, don't they? 
✅  New school clothes that cost a fortune even with coupons and sales.
✅ School supplies
✅ New backpacks
✅ Awesome new lunch kit from PlanetBox
 My daughter prefers to bring her lunch to school because well let's just face it school lunches are not always desirable. But last year I really slacked on getting things ready and put into containers that fit into her lunchbox leaving little room for variety. You see, I'm not the most organized person by nature. I really do try but I tend to loose track of things. I always have lids and containers but never the right lids. It's like matching socks after you wash them, I never have a matching pair. So this time I am determined to start with a plan to ultimately make life easier. I scoured the internet for the perfect lunch box that would provide both simplicity and versatility. I found lots of solutions but most included different plastic containers with removable lids. That just won't work for me. Then I came across the PlanetBox Container. It is essentially a stainless steel lunch tray that latches closed. 

  I have the Rover Planet Box and I will soon be purchasing the smaller shuttle box that will fit in the current lunch bag that my youngest loves. My kids love that they can customize their box with magnets. I love how easy it is to fit into the dishwasher. I will admit that it is a little on the pricey side but I have researched the reviews and since I have received ours it really is sturdy and worth it and will last for years to come. When you fix a meal the night before and put it into the fridge the whole container gets really cold because of the steel and keeps the food nice and fresh. No more messy zip-lock bags or containers without lids.
  Because I like to be inspired, my favorite part is that they have a website http://planetbox.com/pages/meals?u=/ that you can signup for and find inspiring meal ideas and also post your pictures and meal ideas of your own.

7/25/14

Tacos in a bag


We went camping up in the mountains last weekend in our new "to us" overcab truck camper and for one of our camp meals I made Walkin Tacos or Tacos in a Bag which I had found on Pinterest. My family was skeptical at first but couldn't get enough. It was so easy and cheap to make I don't know why I haven't made it sooner. I bought a variety pack of single pack of small bags of chips so everyone could choose whether they wanted Doritos or Fritos. Before you open the bag push in the bottom corners, this makes the bag able to stand upright, then fold down the top a little after you open it.
Then just add your taco meat and whatever toppings each person likes. So delicious, easy to make, and even easier to clean up. 


7/14/14

DIY Uncrustables


  This year my husband and I have been trying to make healthier and cost efficient eating habits a reality for our family's daily life. We have started making our own foods more with real ingredients. And with the new school year looming in front of us I am starting a plan for my girls school lunches that will be cheaper healthier and still fun for them to eat. I always want to make their lunches but last year I just kept getting busy and never had a plan so that is why I am putting this together early this time around so it doesn't get put off plus I'll have a chance this last month of summer to test them out when we go camping and on picnics.  One item I just tested out is freezing our own pb&j Uncrustables sandwiches. I think I picked up this  wonder bread sandwich sealer from the dollar store
You can find it on amazon for about 6 bucks. This is my kids favorite sandwich cutter ever. It really is easy to make a bunch of these in one night then just grab one and go. 
I used the Fred Meyer brand natural peanut butter. It had the best ingredients for the price. Containing only peanuts and salt. And the Smuckers natural fruit spread. Simply spread peanut butter on each slice of bread and put jelly on one slice then close sandwich. Place sandwich cutter and sealer inside of crust area and press down on outer square first to cut off the crust then press down on center to seal. Place on a cookie sheet and freeze for 30 minutes then pace them in a ziplock bag for eating later.
Easier than pie and the kids couldn't care less if it didn't come from a box.

3/30/14

Always time to show your #disneyside

   I know it's been a while since I have posted anything on here. I have had a lot going on lately, plus I work what feels like all the time and when I am home all I seem to do is clean, cook, and sleep rinse and repeat over and over. When I got the opportunity to throw a #disneyside from MomSelect my girls and I were super excited. But my schedule got so crazy and I work most weekends so when I finally got a Saturday off we set up our party,
but of course everyone we invited was either sick or out of town. Which made the girls very sad, that's when I realized we need to show our disney side all the time when and wherever we get a chance. Because disney is about being a kid and being happy no matter how old you are or where you are, just have fun with your family. So that day I took them out to see Frozen and when we got home we had a disney dance party and made goody bags to hand out to our neighbors and friends so they could also share their DisneySide.
    When I think about it, my whole childhood and life has revolved around Disney and so have my children's lives, there is so much innocence and love and learning  in it and we should all celebrate that. You can head over to http://www.disneysidecelebrations.com/ to get some ideas and recipes and have your own Disney Side @ Home Celebration. Even if your on a budget like myself you can still throw an awesome party with supplies from dollar tree they have tons of disney stuff all thoughout their stores from party supplies to picture frames.
    Some of the things we included in the goody packs were Olaf and white chocolate popcorn with sprinkles.

2/11/14

Vintage Cooky-Jar Sugar Cookies

  I found this recipe in a vintage 1953 edition Better Homes & Garden cook book and it by far is the best sugar cookie recipe I have ever tried and my go to for Christmas and cookie decorating like my daughters up coming school Valentine party and our #DisneySide at home celebration. These cookies taste better after they have cooled completely and even better the next day.


I generally make 3 - 4 batches of this very recipe in order to have plenty of cookies to fill the jar and give away.


2/3 cup shortening/butter
3/4 cup sugar
1 egg
1/2 tspn vanilla
2 cups sifted flour
1 1/2 tspn baking powder
1/4 tspn salt
4 tspns milk

Thoroughly cream shortening and sugar in large bowl. Add egg, beat until mixture is light and fluffy. Add vanilla and mix thoroughly. Sift dry ingredients; stir into creamed mixture together with milk.
Divide dough in half. Chill 1 hour so it is easy to handle. Roll out one half on floured surface keeping other half chilled til ready. Cut with cookie cutters and place on cookie sheet. bake for 11 minutes at 350*

1/29/14

Mini Nilla Wafer Cheesecake Bites

These bite size cheesecake morsels are delicious and easy to make and great for parties, school, work, tea parties, or whenever.

What you need
  • makes 72 mini cheesecake bites
  • 1 box of Mini Nilla wafers cookies
  • 3 (8 ounce) packages of cream cheese, softened
  • 1 cup of white sugar
  • 3 eggs
  • 1 teaspoon vanilla extract
  • Optional pie topping


What you do 

  • Preheat your oven to 325 degrees F. Line 24 mini muffin cups with liners then place one mini Nilla wafer in each cup.
  • In a mixing bowl beat the sugar and softened cream cheese together til smooth
  • beat in the eggs one at a time then stir in the vanilla extract.
  • spoon mixture into gallon ziplock bag and cut small corner to quickly fill  mini muffin cups, filling each cup 2/3 full
  • Bake for 15 minutes
  • cover and refrigerate until ready to serve 
  • you can also top with a cherry, strawberry, blueberry, or whatever else your heart desires


1/28/14

Easiest waffle sandwich

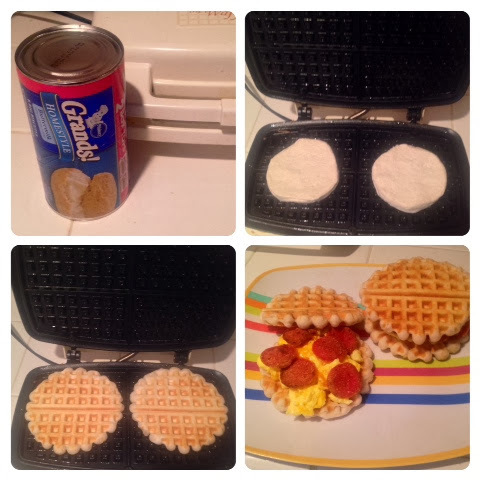
   Looking for a simple recipe that makes little to no mess in the morning? I know I am not much of a morning person and hate using a ton of dishes to make breakfast, that I'm going to have to clean up after, which is why this works in so many ways for me. All you have to do is take a package of grands biscuits and flatten each one out a little then cook in a waffle maker. Brilliant right?! My daughter loves it just as a waffle with syrup but My husband and I make them into waffle sandwiches. For this one I made scrambled eggs with cheese and topped with cooked pepperonis.

Let me show you my #DisneySide

  Recently I was chosen, thanks to Disney Parks and MomSelect, to host a Disney Side @Home Celebration where I was told I would receive a free party kit but it was a total surprise of what it would contain. So you can imagine our excitement when the ups pulled up with this giant box 
The girls and I opened it up and found a super awesome 20" American Tourister spinner luggage which happens to be THE official luggage of Walt Disney World Resort. 
Inside the suitcase it was filled to the brim with Disney magic so that we can start planning for our personal #disneyside at home celebration. I'm thinking our theme will be a Disney valentines party 
I can't wait to host our party thanks to Disney Parks, MomSelect, HP, and American Tourister. I am also excited to see the all the other Disney side parties being thrown this next month.

1/15/14

Must see movies from the 80's and 90's to watch with your kids.

     I don't know about you guys but I remember some awe inspiring movies about the hardships and the magic and wonder of growing up. I was thinking about this last Christmas eve when I was trying to think of what movie I wanted to watch with my girls before getting ready for bed and that's when I thought of Home Alone. I mean I hadn't seen that movie in forever and neither of them had ever seen it. So we watched it and my kids actually loved it as much as I did when I was a kid. Now we have movie night at least once or twice a week exploring the great classics of the 1980s. Ha WOW, that some how makes me feel really old. The following list is just the movies I remember and loved. If I missed any awesome movies that I may need to watch let me know so I can add it to my must sees. Most of these I have found streaming online on a website called putlocker when I do a google search of the title and online stream just don't click on Watch in HD or Download, scroll down a little and you will see the streaming window to click play.

  • Batteries not included
  • Flight of the Navigator
  • Radio Flyer
  • The Never Ending Story
  • Return to Oz
  • The Goonies
  • Pee-Wee's Big Adventure
  • The Land Before Time
  • Home Alone
  • E.T The Extra Terrestrial
  • Hook
  • The Last Star Finder
  • Ghost Busters

Now break out the popcorn and enjoy!